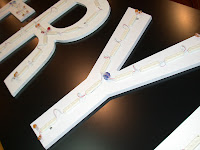
LEDs are changing the face of the sign lighting sector not only because they are simple to use, but they have a longer lifetime, lower energy consumption, high reliability and low operating and maintenance costs.
To produce the best illuminated signs there are a few key factors to remember:
1. The depth of the letter is important and will determine the number and type of modules you need.
2. Avoid hot spots by closing the distance between the modules; using a LED with a wide angle beam such as an optical lens; or by increasing the number of modules.
3. Paint the return of the letter white to reflect light and increase brightness.
4. Use the correct driver.
Here Spectron show you a step-by-step guide on how to create LED backlit built-up letters.
Equipment List
Spectron WEE-3 modules
UY2 connectors
UB2A connectors
Cable
Driver
STEP 1
 LEDs are fixed onto the back tray inside a built up letter to give a glow within the body of the letter and illuminate the face. The closer the LEDs are to the face of the letter, the brighter it will be. If possible, locate the power cable at the top of the letters so that it is not
visible when looking up at the sign.
LEDs are fixed onto the back tray inside a built up letter to give a glow within the body of the letter and illuminate the face. The closer the LEDs are to the face of the letter, the brighter it will be. If possible, locate the power cable at the top of the letters so that it is not
visible when looking up at the sign.To avoid spotting, a test is carried out to determine how many modules are required and how far apart they should be spaced. We recommend you ask your supplier for advice as different types of modules accommodate different depths of built-up letters. Eg, for shallow letters, a LED with an optical lens will give a wider spread of light, limiting hot spots.
Adding more LEDs is rarely the remedy for spotting and will end up costing you more money and power unnecessarily.
This example uses 11no. Spectron WEE-3 modules within a 90mm deep letter.
STEP 2
To connect the cables, use UY2 connectors to join any cables and cap the ends.
STEP 3
Painting the inside of the built-up letter white will reflect the light from the LEDs and increase brightness by over 30%.
STEP 4
Fix the back of the letters to the signtray, feeding cables from individual letters through the back. Link up to a single cable using UB2A connectors and connect to a power supply. LEDs need a driver to convert 240V power to the 12V required to run the LEDs. If not connected to a driver, the LEDs will fry and become damaged beyond repair. To determine the size of the driver, calculate total wattage of the modules used.
To extend the life of a LED driver, generally only 80% of the output power should be used. However, Spectron drivers have 20% excess built in so that you are able to use 100% of the stated output power.
For more advice on the application of LEDs, please do not hesitate to contact Spectron LED
on 0161 236 8828 or visit www.ledsignsandlighting.co.uk.


No comments:
Post a Comment